Upon logging in, instructor users see a navigation bar at the top of the screen and, in the remainder of the screen, the student view of content that is visible in the section.
The navigation bar provides easy access to tools for modifying the contents of PCRS, and is split into three tabs: "Problems", "Content", and "Code Editor". The "Problems" tab allows instructors to create and edit programming, multiple choice, and short-answer exercises, while the "Content" tab provides tools for organizing the layout of PCRS, as well as the ability to add videos. The "Code Editor" is a direct link to the tool for tracing code.
The right-hand side of the navbar also contains a few useful tools. Clicking on "Viewing as ..." allows an instructor to enter a user's ID. While viewing "as a user", the instructor will see what that student sees -- including their history. An instructor can also change the section they are viewing as.
A few icons are used consistently throughout the system. Look for a right arrow in a circle to go to content, a pencil to edit an item, and a graph to get statistics about an item.
The "Problems" tab contains links to the available problem types: programming exercises (C, Java, Python, and SQL and relational algebra), multiple choice questions, and short-answer questions. The problem pages are structured similarly, containing a "+" icon at the top for adding new problems followed by a list of all pre-existing problems with links for attempting (arrow-icon) and editing (pencil-icon) each problem.
For instructions on how to add a problem to a page, please refer to Challenges.

For all of the programming languages supported by PCRS, pressing the "+" icon leads to a form for creating a new problem. Existing problems can be edited by clicking on the pencil icon next to the problem description.
The exact fields for various problem types vary, but most include:
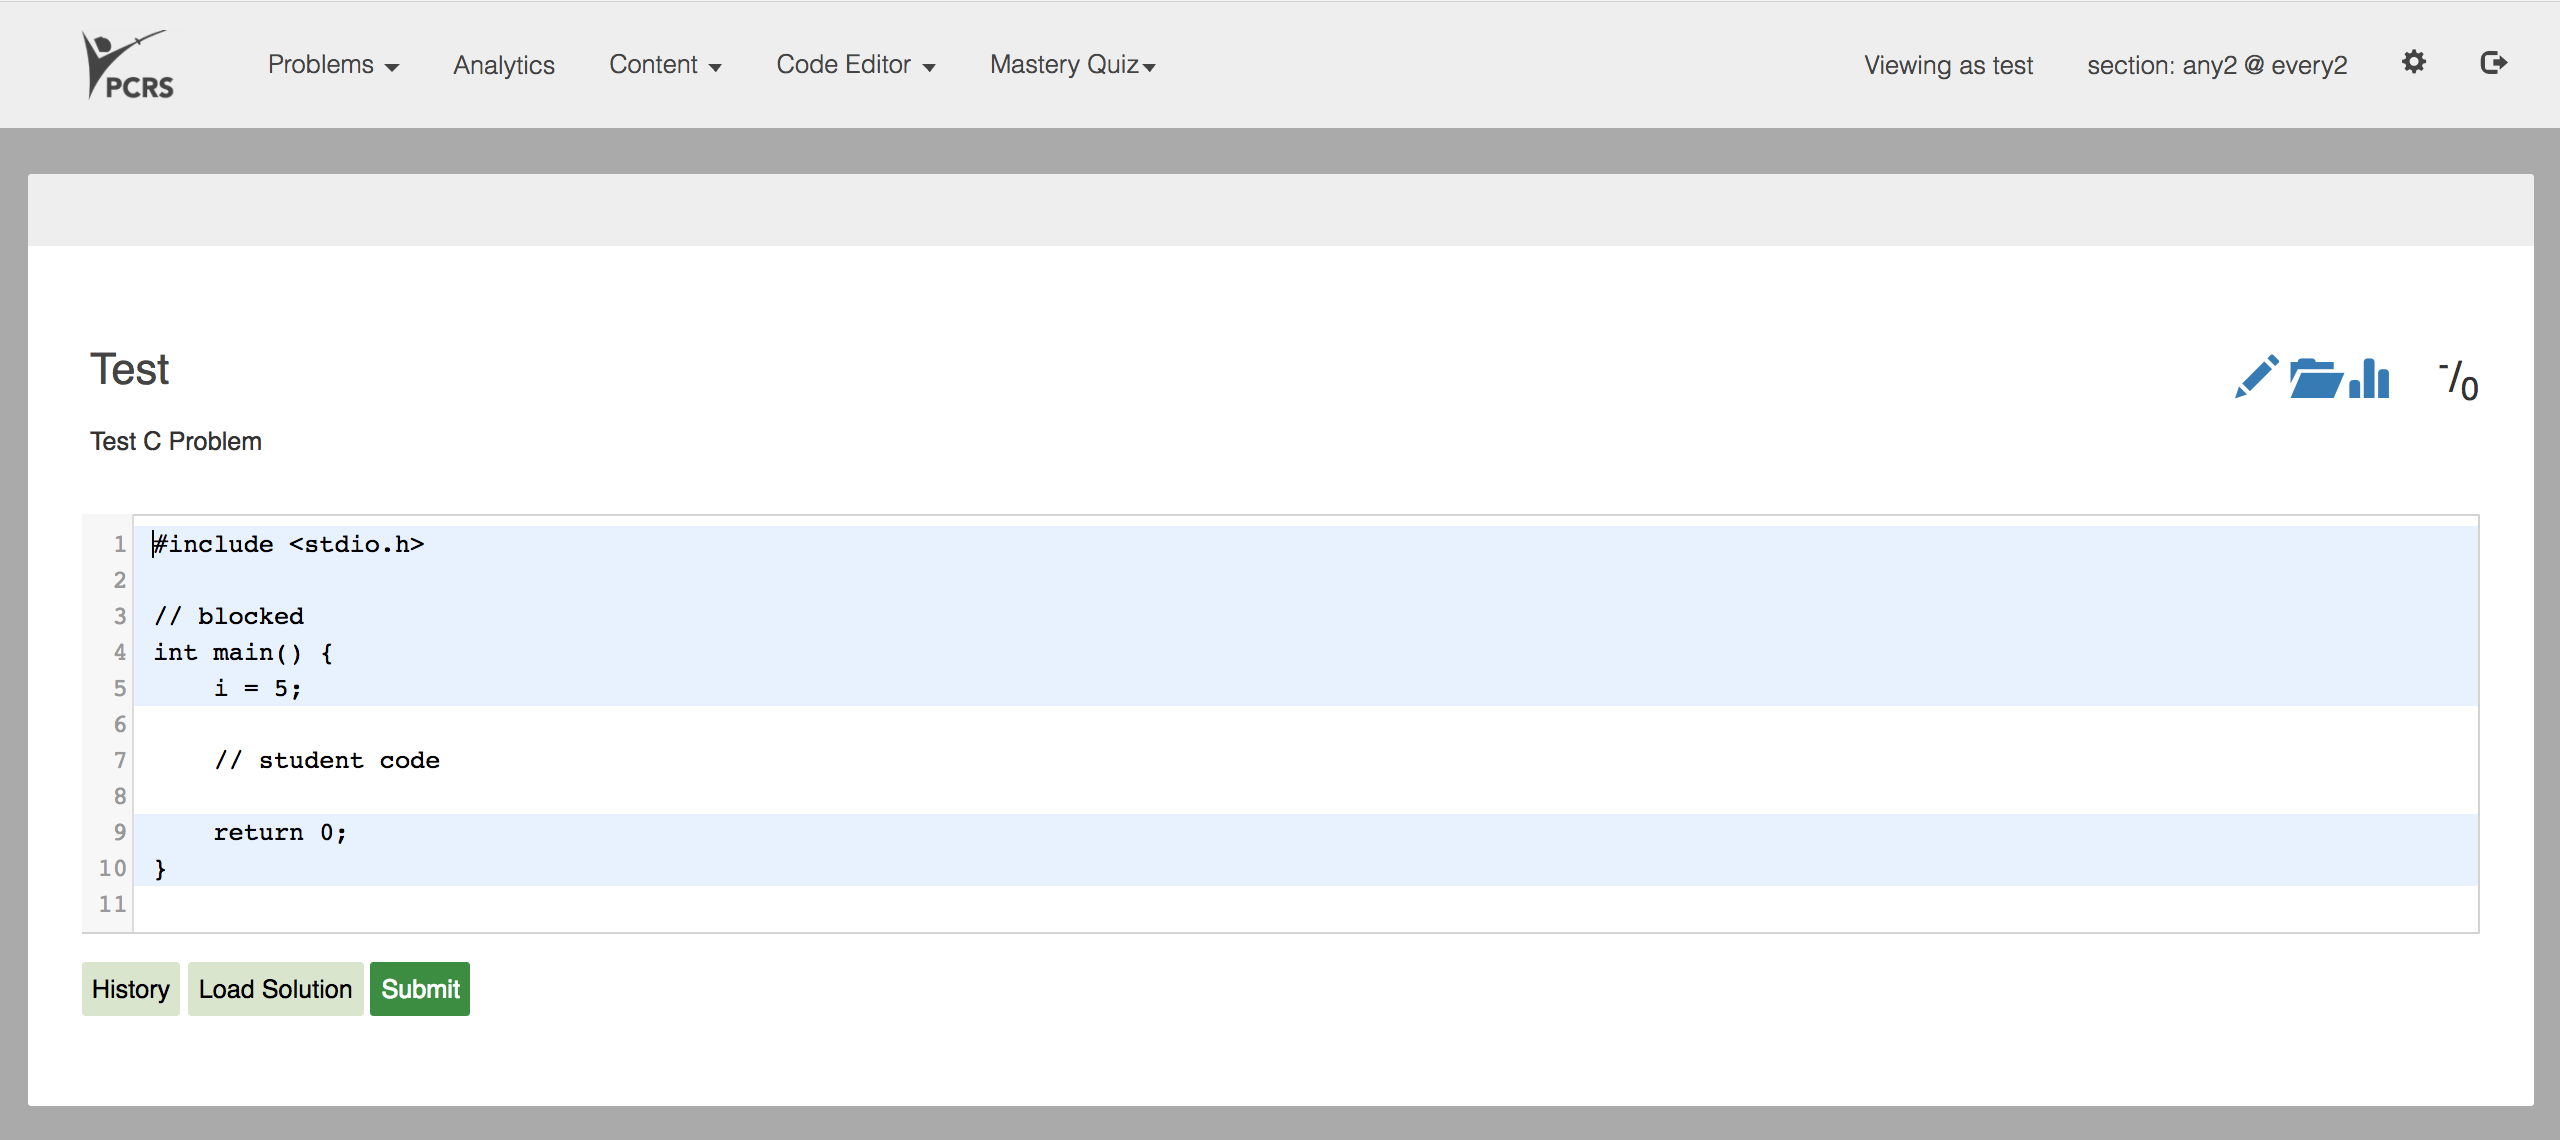
The contents of the "Starter Code" field are displayed to the student when they first load the problem. The student adds to the field containing this code and then submits their solution for testing. Any text can be entered into the field, but it's usually advisable to enter code and comments in the style of the language being taught.
In addition to text, PCRS-C and PCRS-Java also support three tags that determine the visibility and editability of sections of the code: student_code, blocked code, and hidden code. In the other languages, the entire contents of the Starter Code field is displayed to the user.
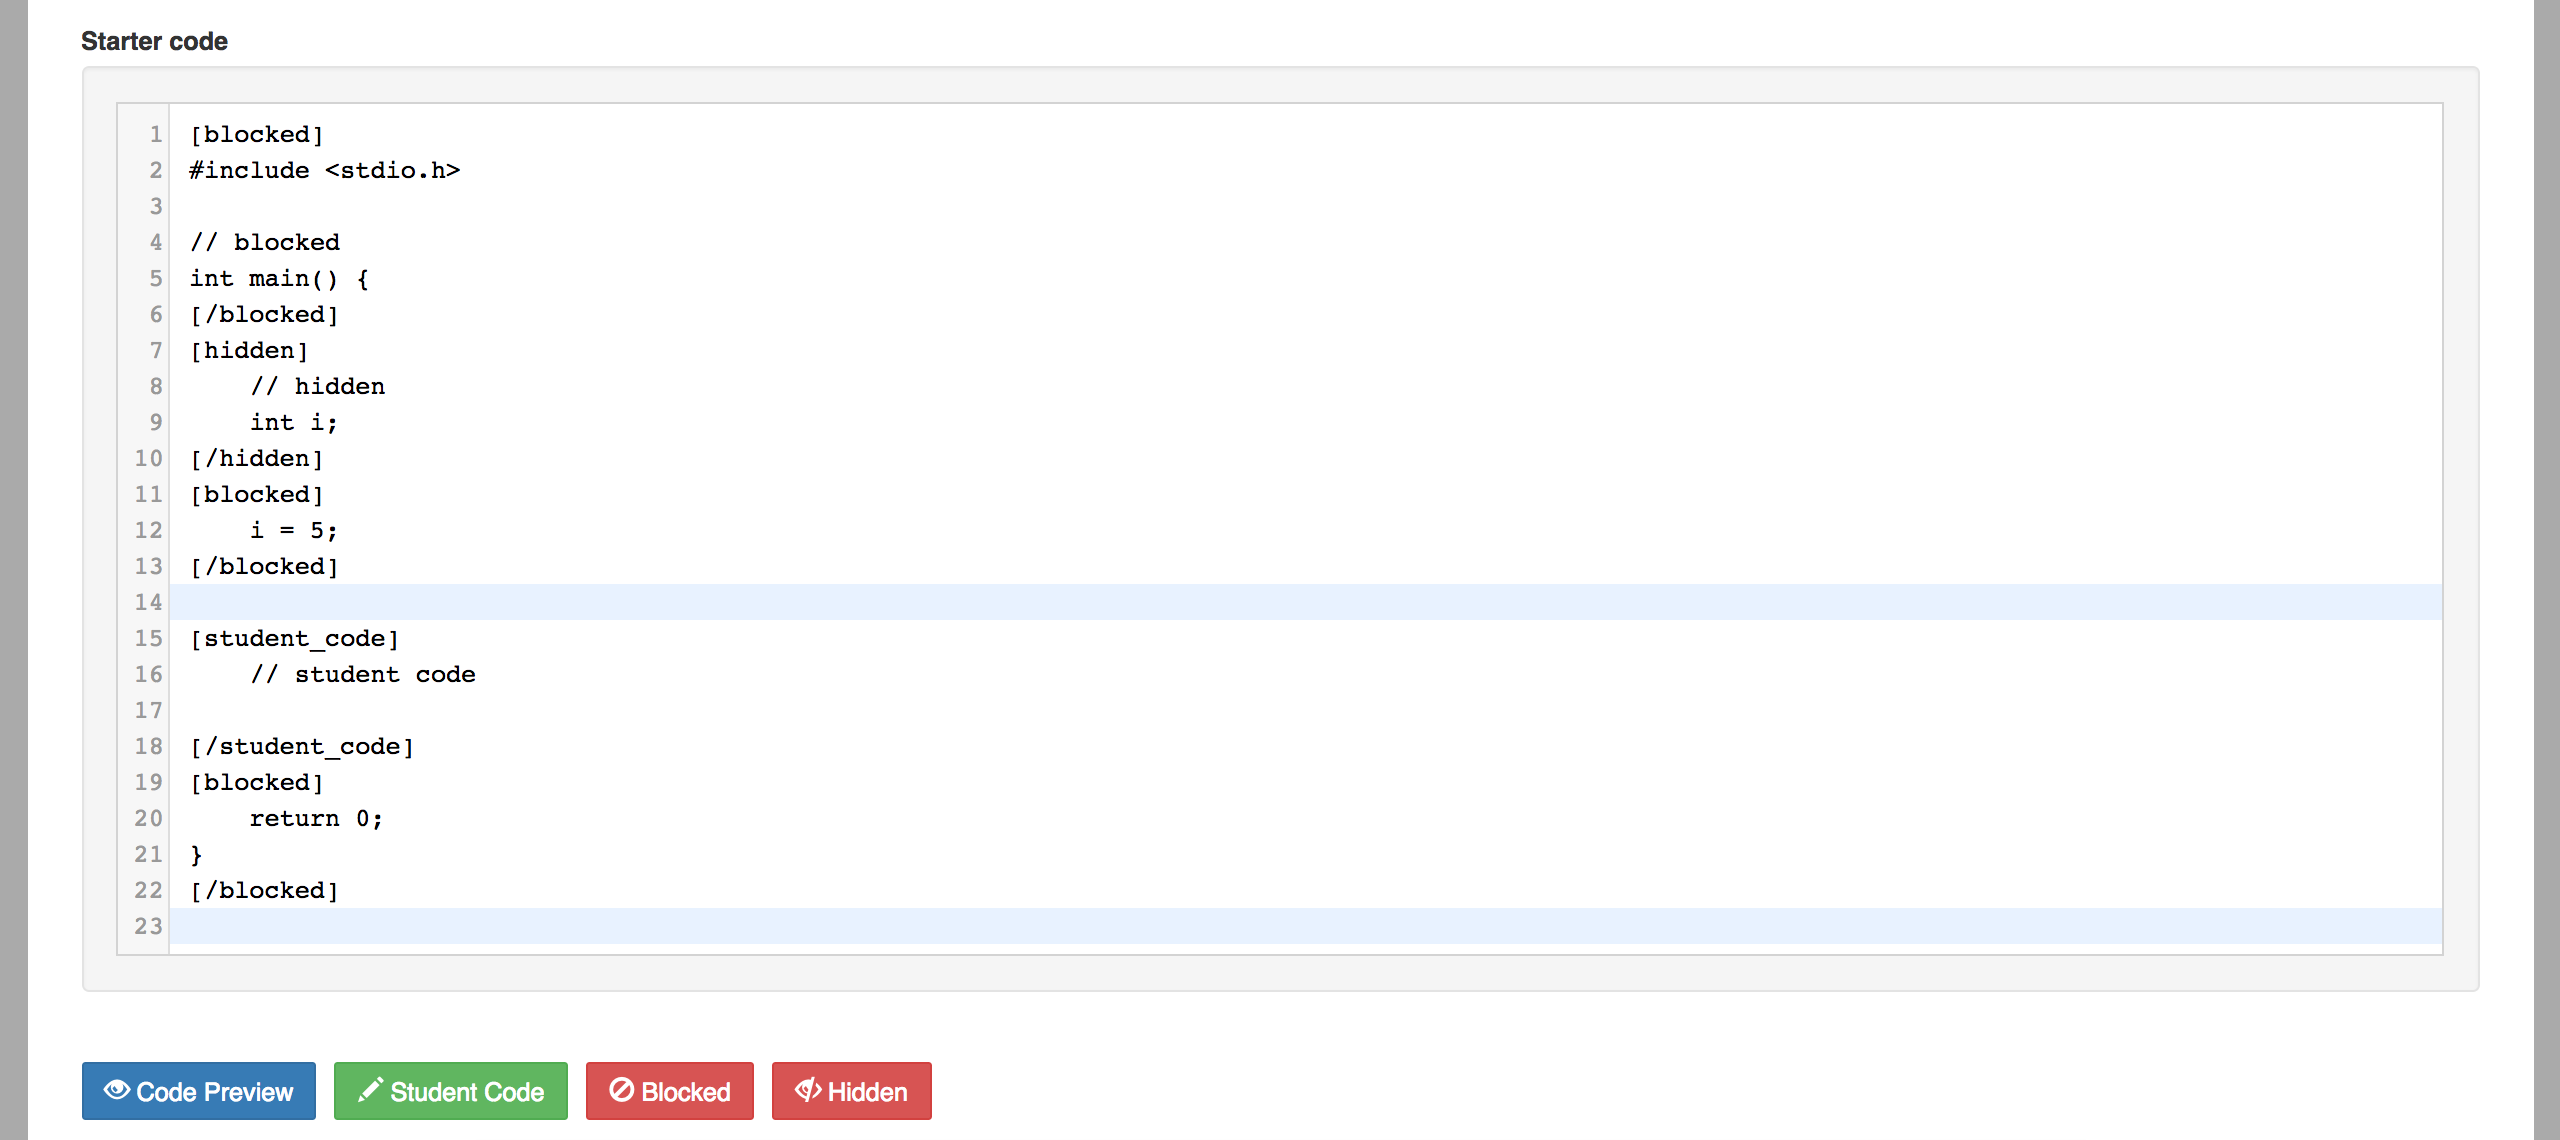
Tags can be entered as plain-text, or added by highlighting starter code text and clicking on either the "Student Code", "Blocked", or "Hidden" button.
Student submissions are graded based on the number of test cases passed -- if a submission passes every test case, the solution is marked as correct. Submissions to problems with no test cases will always be marked as correct if they compile.
The method for testing depends on the language of the exercises.
For C and Python, new test cases can be added by pressing the (+) icon in the "Testcases" section of a problem page. For SQL, pressing the (+) icon associates new schemas to the problem. For Java, add tests directly to the unittest class. Test cases can be edited as long as there are no submissions to the problem. If submissions have been recorded for the problem in question, you will need to clear submissions before adding or altering the problem's test cases.
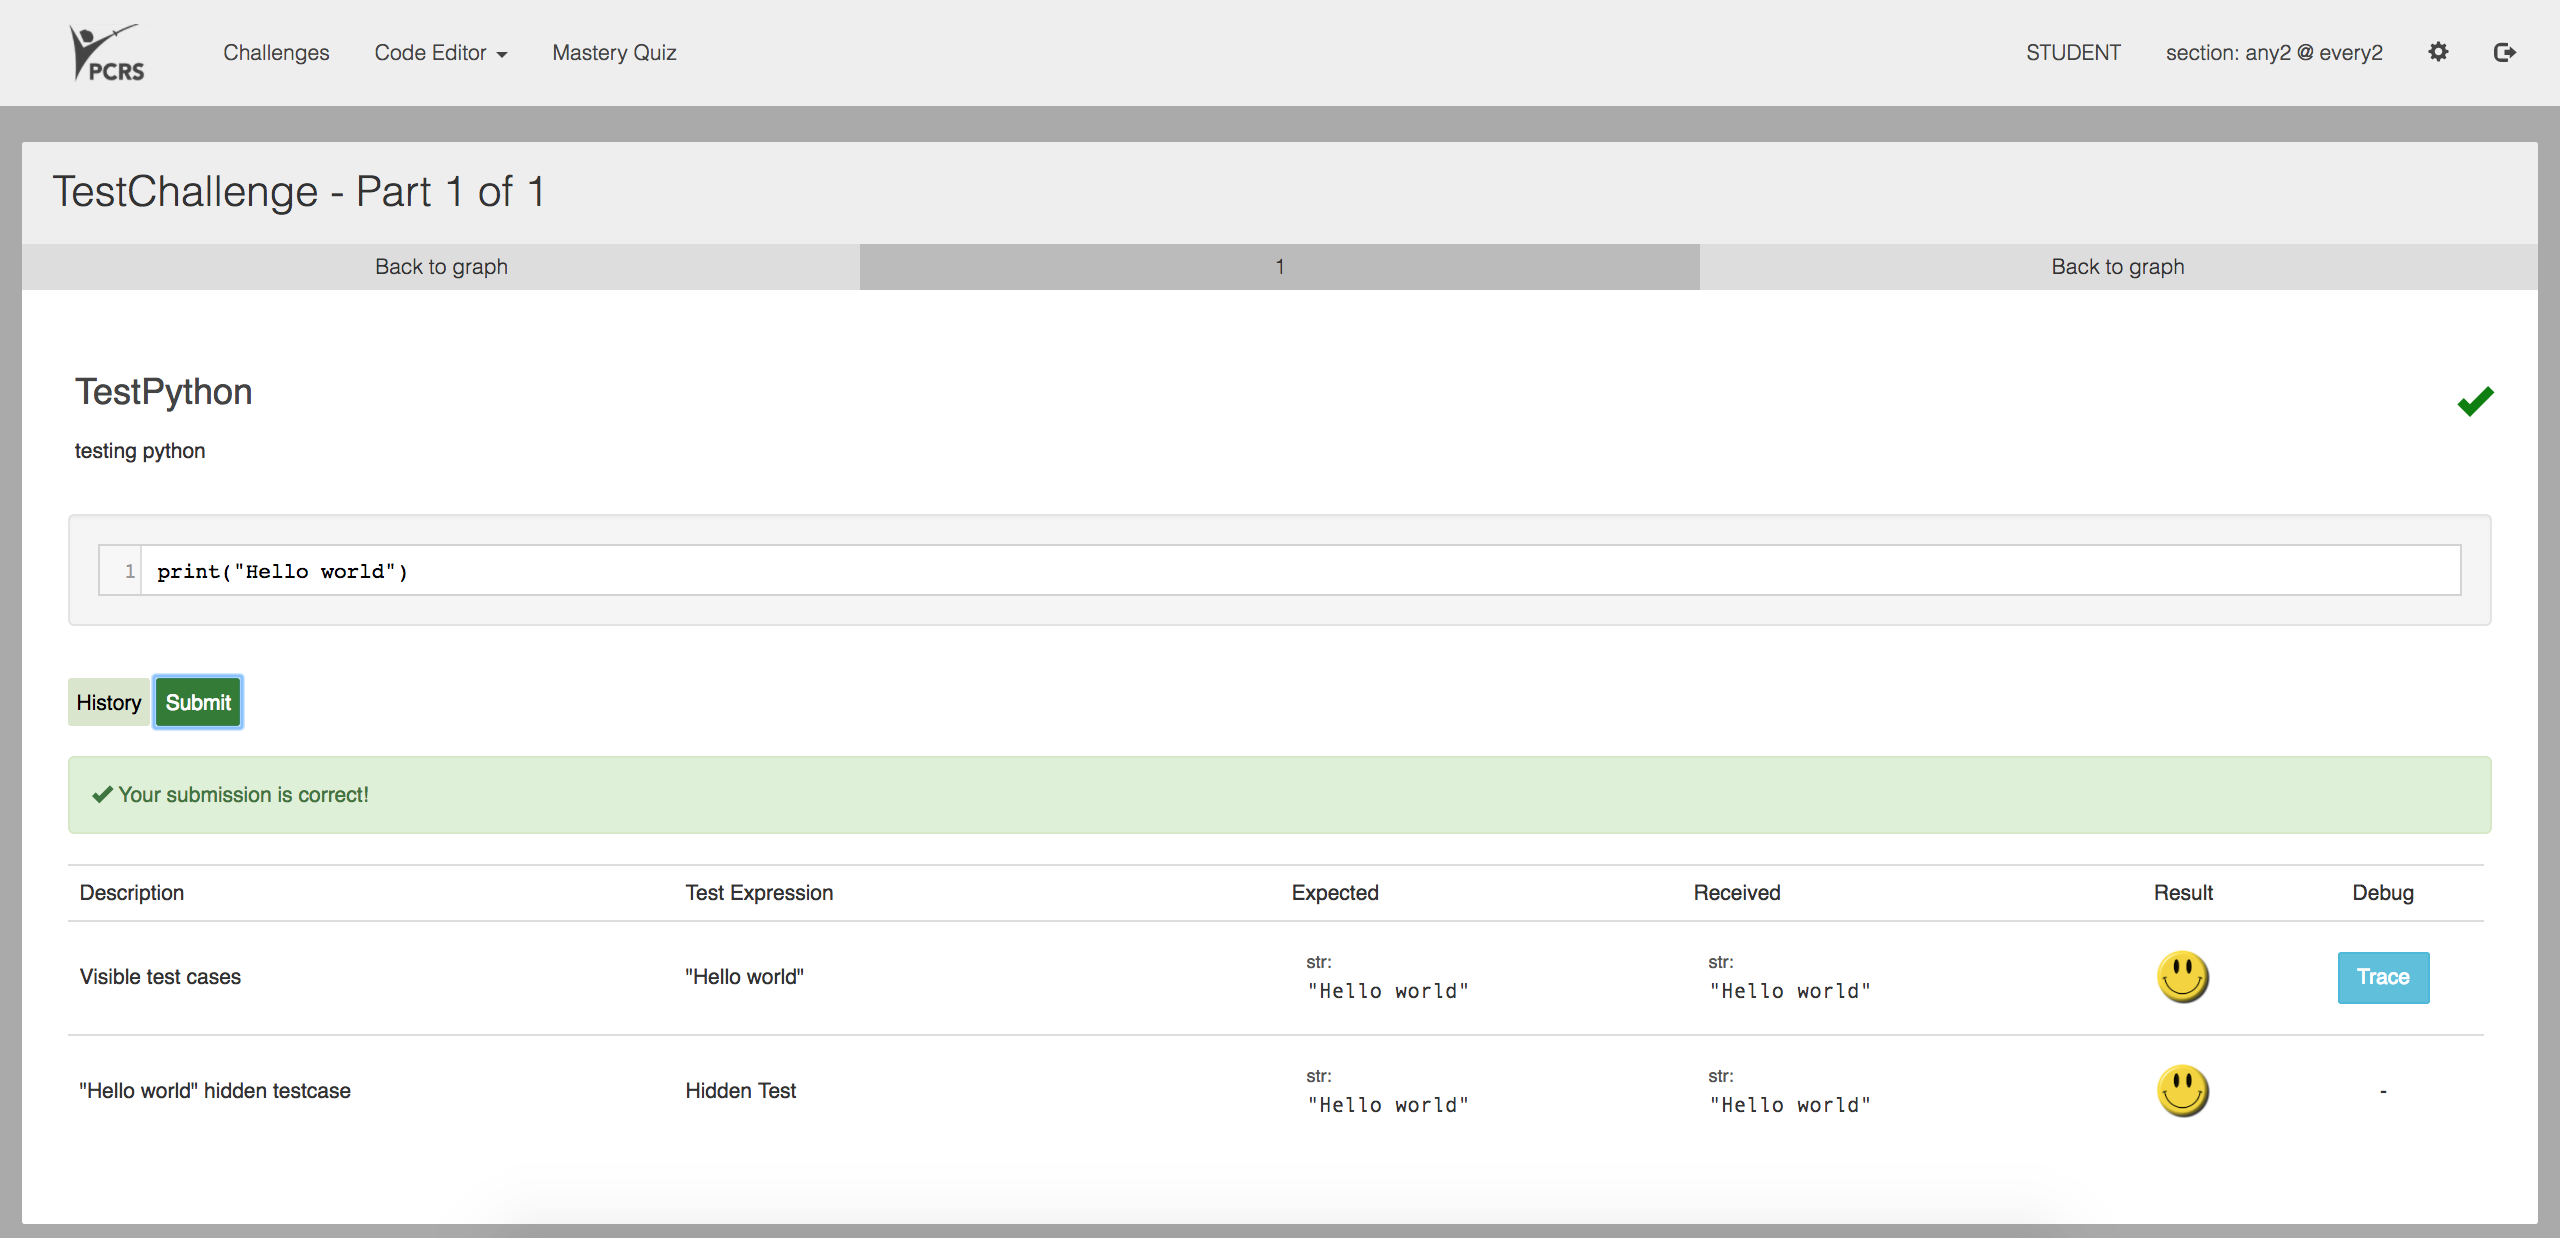
Each test case also has visibility that can be altered by checking / unchecking the "Testcase visible to students" box at the bottom of the testcase editing page. If set to visible, students will be able to view the contents of the "test input" and "expected output" fields. If not, then the students are shown the test case description but no details about what their code generated in that test.
In addition to programming problems, PCRS supports multiple choice and short-answer style problems.

Short-answer questions have a Solution field instead of Answer Options. The field should contain valid python code to evaluate the student's submission (stored in a variable submission) and to place the mark in a variable named score.
New multiple choice options can be added to a problem by clicking the (+) icon in the "Answer Options" of a multiple choice problem page, and pre-existing options can be edited by clicking on the pencil (pencil-icon) icon as long as there are no submissions to the problem. If submissions have been recorded for the problem in question, you must clear them before adding or altering the problem's answers.
The edit / add option page consists of an "answer text" field and an "is correct" box. In the "answer text" field, you may enter text to be displayed for that answer option. If you'd like to accept the option as a correct choice, check the "is correct" box.
Questions may have zero, one, or multiple correct answers. If a question has zero correct answers, then it is marked correct if a student submits the problem without selecting any options. If it has multiple correct answers, then it is marked correct only if the student selects all of the correct answers.
The "Content" tab contains six links: Tags, Videos, Challenges, Quests, Sections, and Student Quest List View. These pages allow you to modify how the content in PCRS is organized, as well as to add supplementary videos.
The "Tags" page allows you to add, edit, and delete available tags which can be used to search for problems.
To add a new tag, press the (+) icon at the top. Clicking the pencil (pencil-icon) icon next to a tag takes you to a page where you can change the tag's name, or delete the tag entirely.
The "Videos" page allows you to create, modify, and delete videos presented in PCRS.
To add a new video, press the (+) icon at the top -- this takes you to the "New Video" page where you can then specify information about your new video by filling in the fields. To edit or delete a video, click the pencil (pencil-icon) next to the video's name on the Videos page.
Note that adding a video does not automatically add it to a page. For instructions on how to add a video to a page, please refer to the section on managing content in challenges.
Challenges represent collections of related videos and exercises. A Quest may have one or many challenges. See the Quests section for details on organizing challenges within quests.
To add a challenge, press the (+) icon at the top of the page and enter a name and description for the challenge. If you would like the problems in the challenge to be graded, check the "is graded" box. Graded challenges can have a due date set in the sections interface and show up in grade reports. Challenges are "open" (visible) to students by default. If you wish for a challenge to be invisible to students (for maintenance, or so you can release it during class), then set its visibility to "closed".
After saving a challenge, you can manage its contents by clicking on the "Manage Content" button in the bottom right.
The "Manage Content" page allows you to modify the contents of a challenge, such as which problems and videos appear in each page, as well as the order in which items appear.
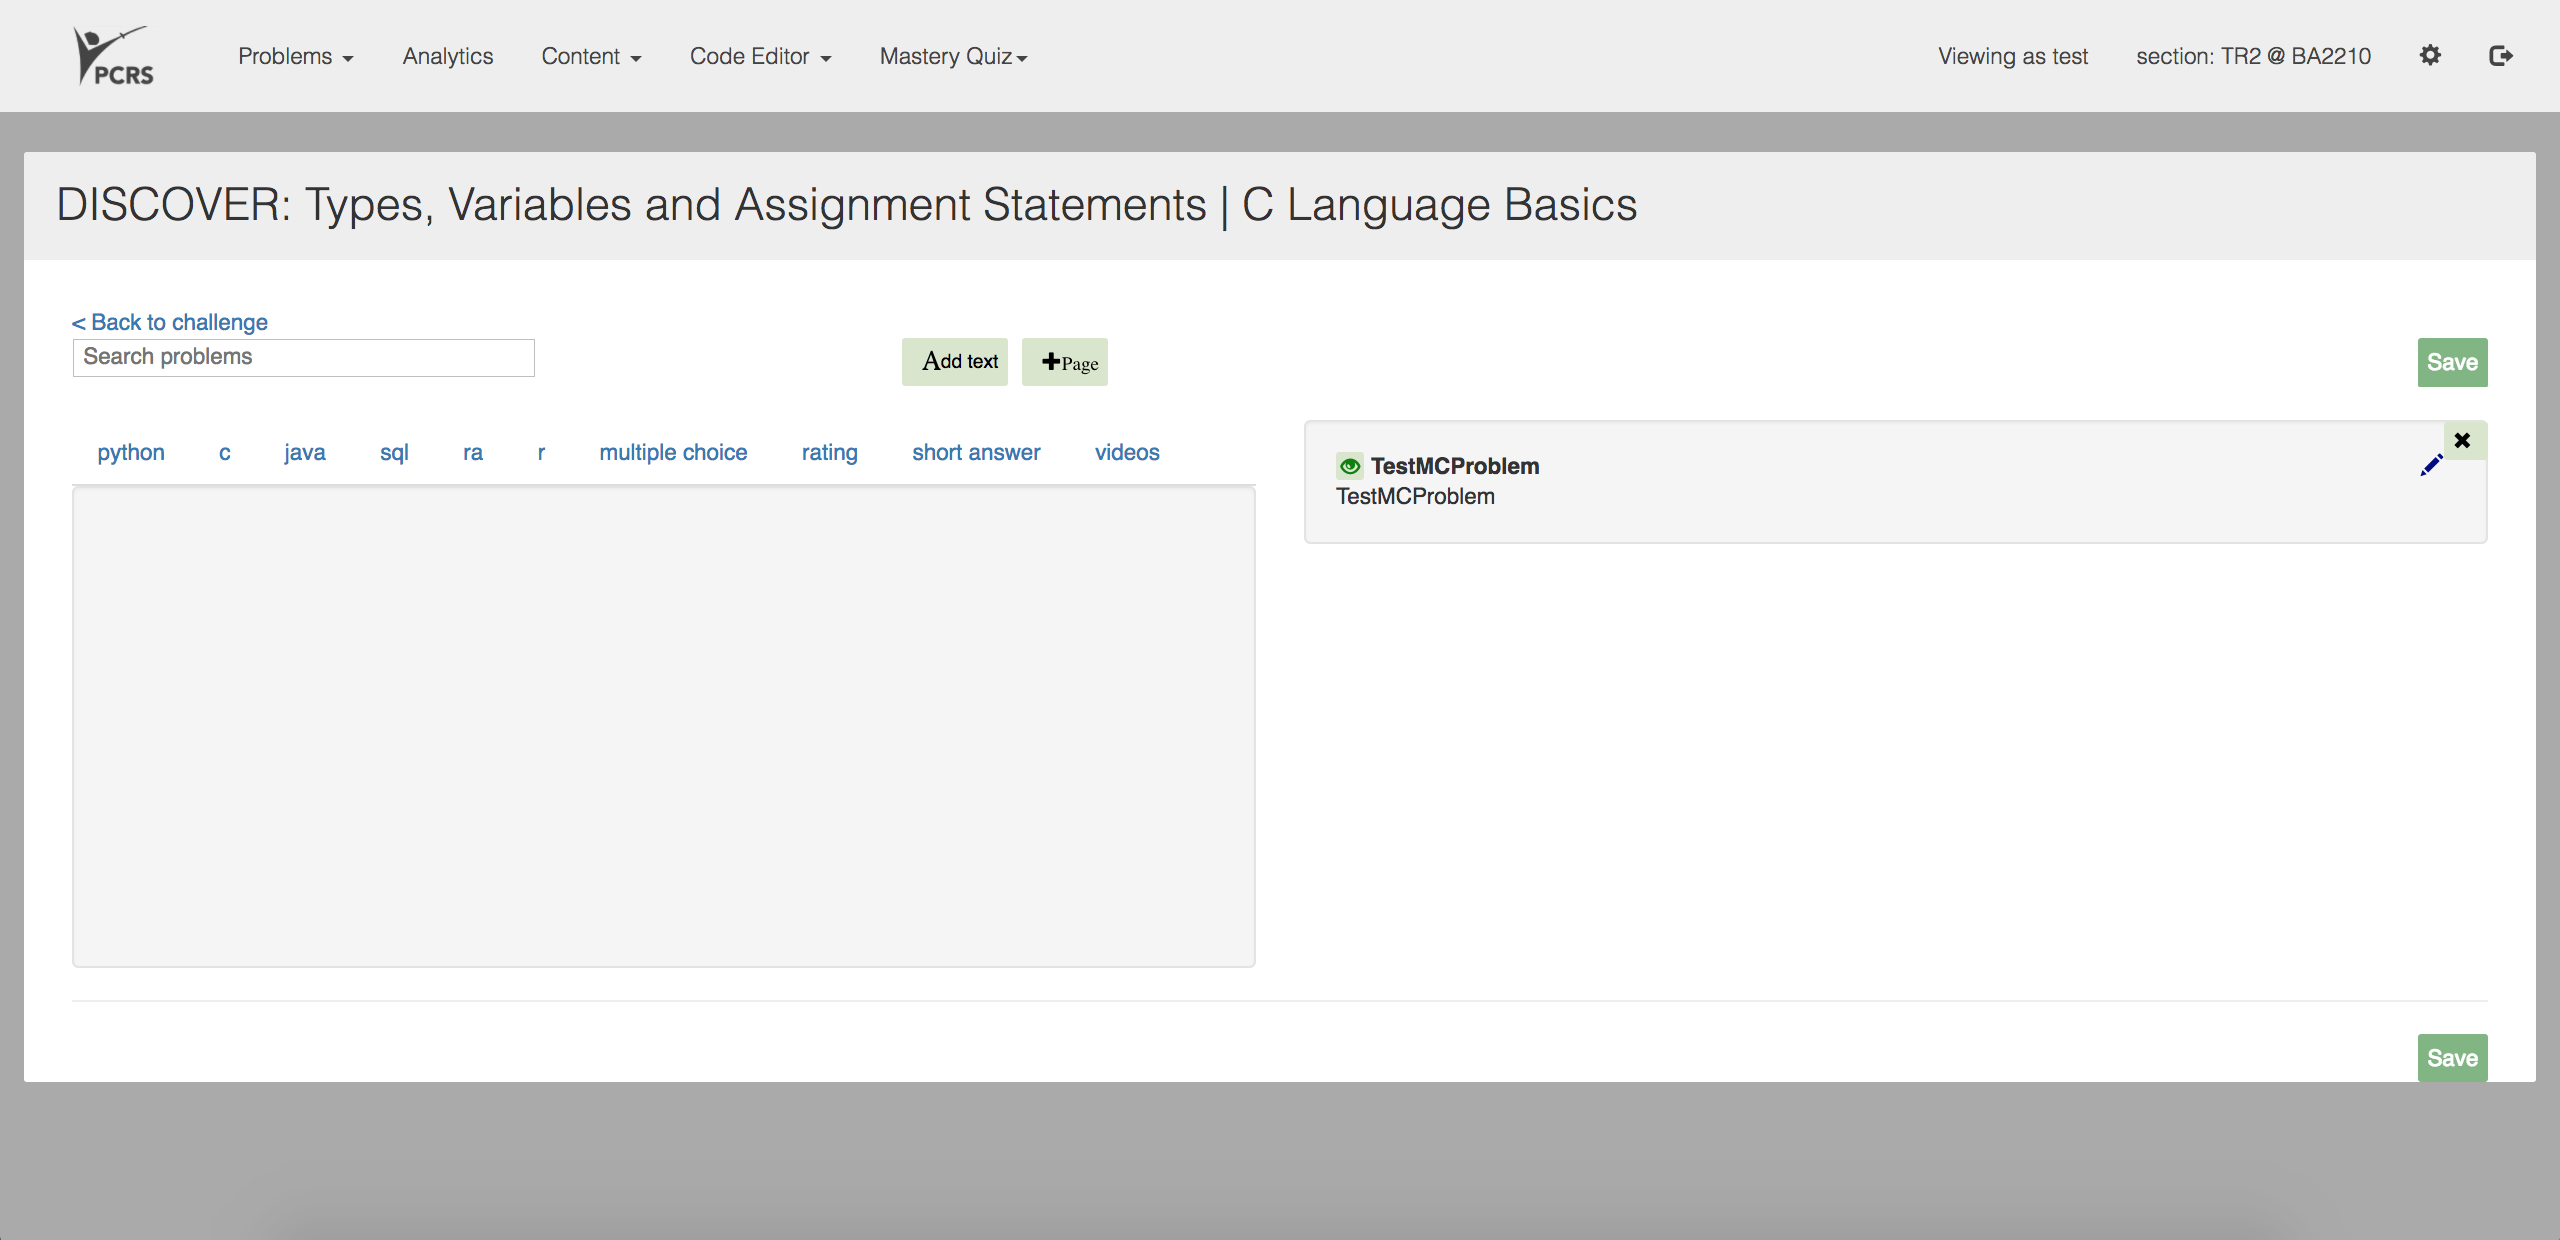
The page is mainly divided into two parts. Listed on the left side of the page, in separate tabs, are the multiple choice problems, programming problems, and videos available on PCRS. The right side contains the current contents of the challenge. A new challenge begins with no content, so the right side is initially empty.
To begin adding content to a challenge, you must add a new page to the challenge. Each page is a box for content. Pressing the "+ Page" button adds an empty box on the right side with an "X" in the top-right corner. You may have multiple pages in a challenge, each represented by its own box, and can delete unwanted pages by pressing the "X" in the top right of a page.
To add a problem or video to a page, drag and drop the item you'd like from the left onto a page's box on the right. The order that you place the items on the right will be the same order in which they'll appear. Each item may only appear in one challenge, so if you do not see a problem or video in the left box, check to see if it has already been added to another challenge.
If you'd like to add text to a page, select a page by clicking somewhere on its box, press the "Add Text" button next to "+ Page", enter the desired text (using HTML formatting), and then press save. Pre-existing text fields can be edited by clicking on the pencil icon in the text object.
To remove an item from a challenge, click the "X" in the top-right corner of the item.
After you're done, don't forget to press the "Save" button in the bottom right of the page. New text boxes and deletions are saved automatically (since they need to be placed in the database), but the order of challenges isn't saved until you request it.
Mastery quizzes are essentially timed challenges with limited attempts.
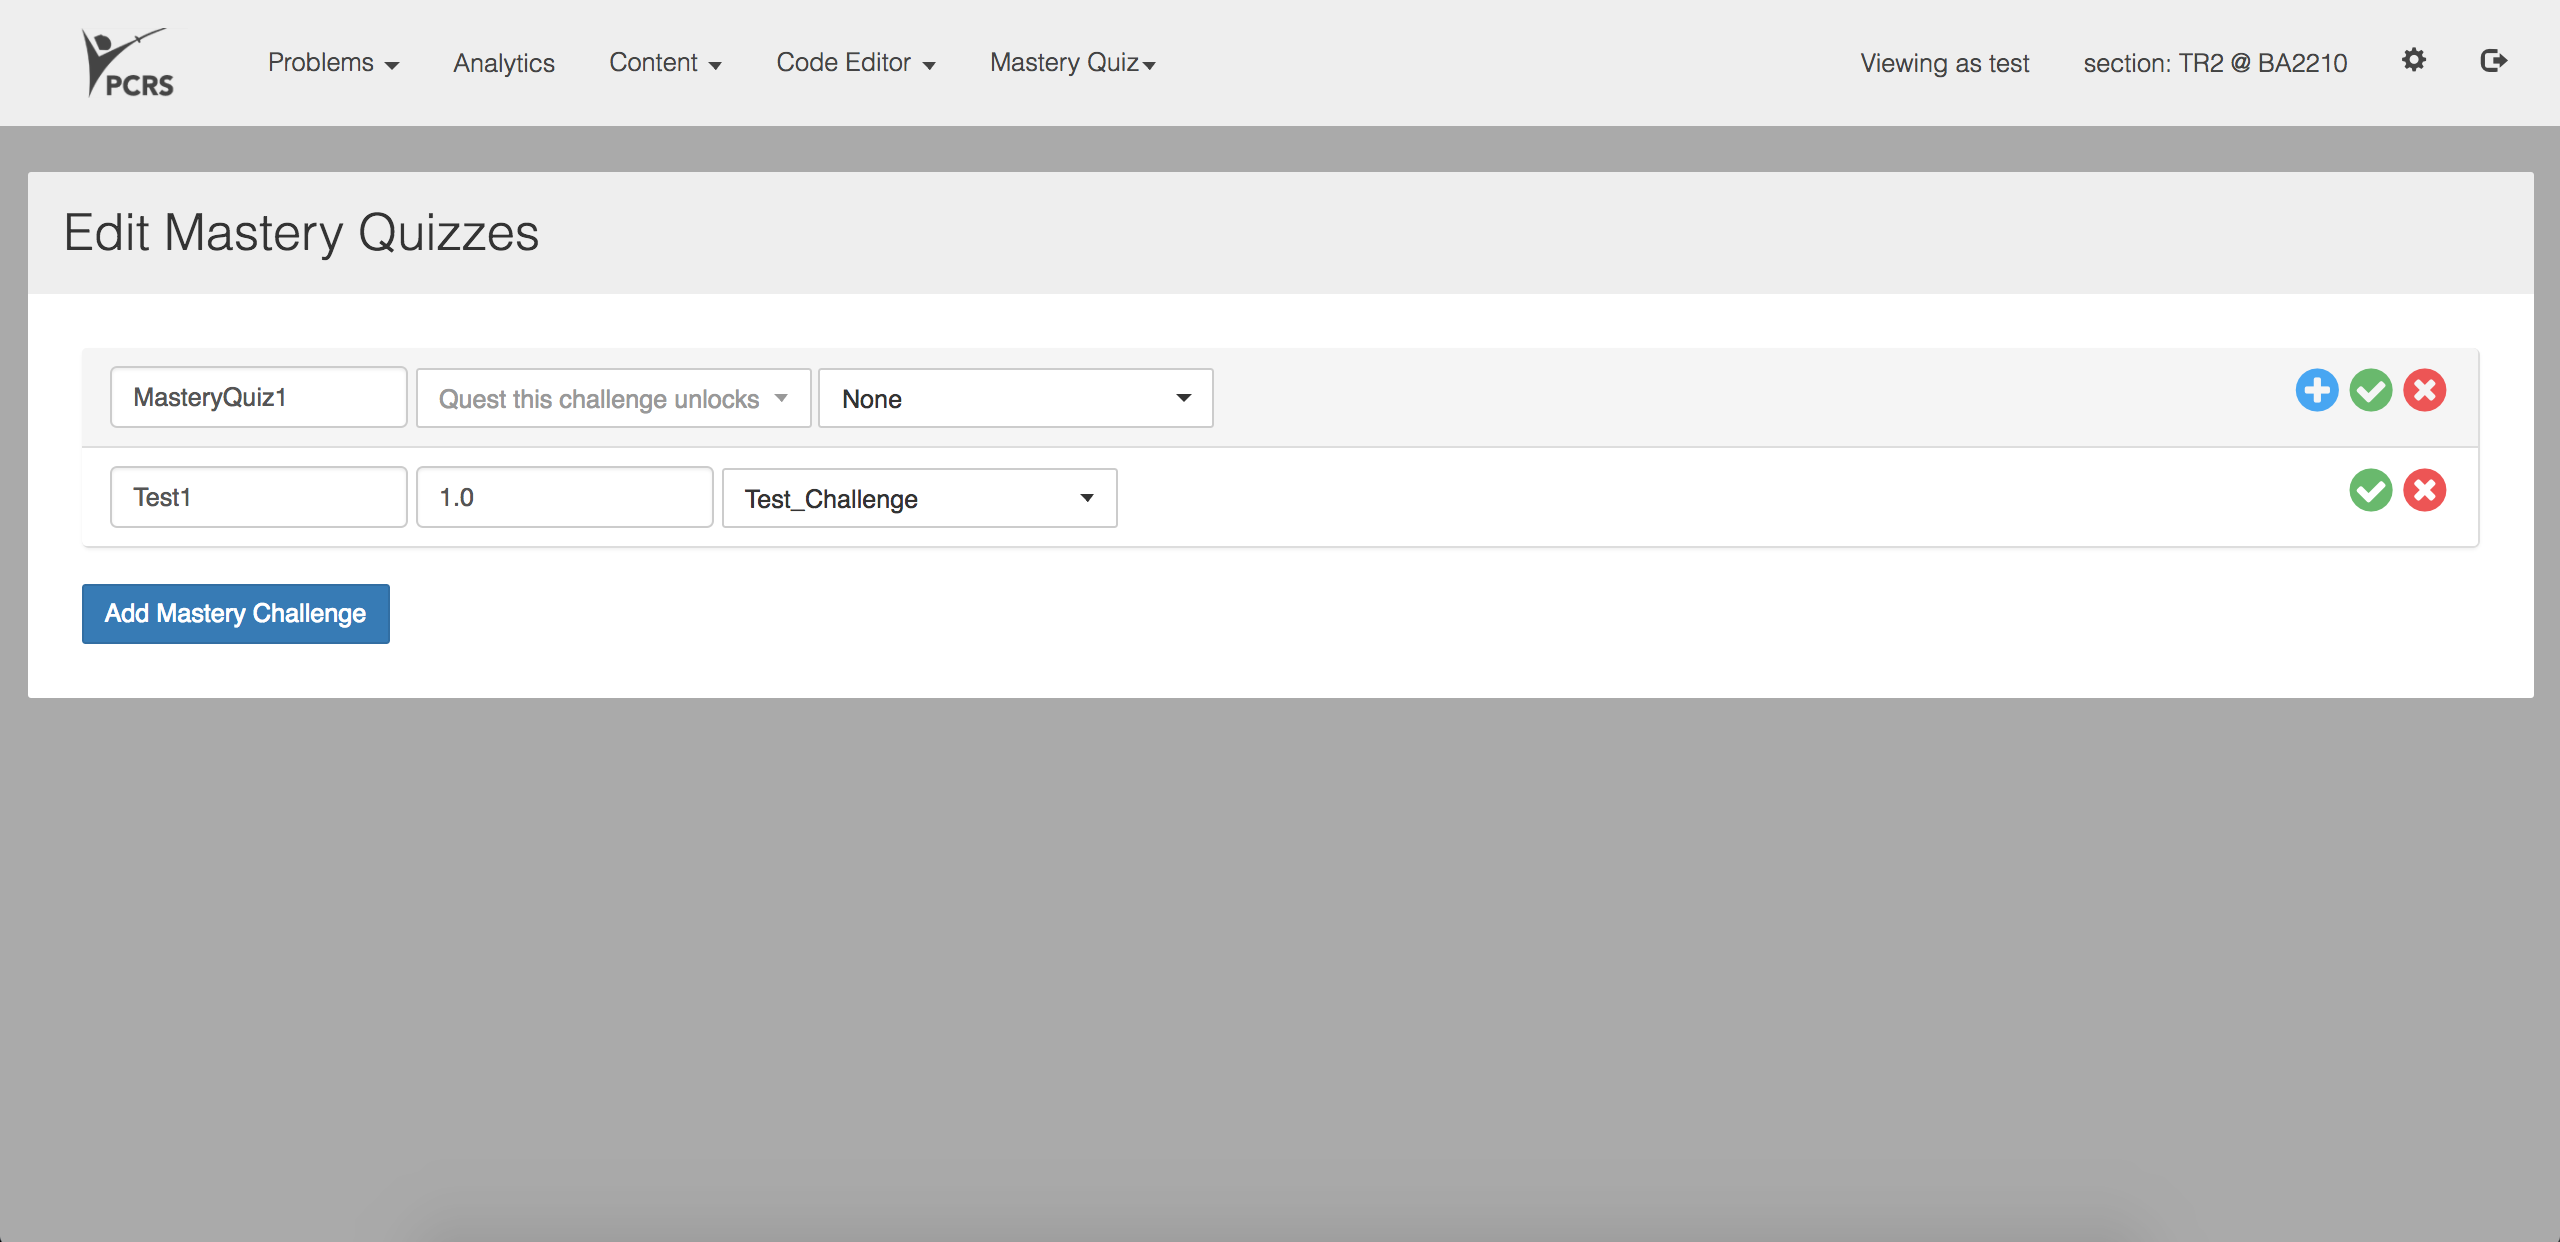
You can create a new Mastery Quiz by going to Mastery Quiz, Edit Quizzes and clicking on "Add Mastery Challenge". Mastery Quizzes hold tests - Challenges. By clicking the "+" icon on a Mastery Quiz, you can add a new test. For new tests you need to specify 3 parameters - name, pass threshold and the challenge it points to. You can only point to a challenge that is not included in any Quests.
You can set custom times for users by going to Mastery Quiz, Edit Users.
In order to start/stop a Mastery Quiz, go to Mastery Quiz, Start/Stop Quiz. Once you start a quiz, you will be provided a quiz code. Students can join a Mastery Quiz using the code. Once the quiz timer expires, the user is taken to a results page with the results of their most recently completed quiz.
Quests are the highest-level organizational category in PCRS. Each quest contains a set of challenges, and the student view of the system consists of a list of the available quests.
To add a new quest, press the (+) icon at the top of the page and enter a name and description for the quest. Setting the quest's mode to "live" will make it visible on the main page. To delete or edit a pre-existing quest, click the pencil (pencil-icon) to the right of the quest's name and then click the delete button at the bottom of the page.
The interface of the "Quests" page is similar to the "Manage Content" page of challenges. To add a challenge to a quest, drag and drop the challenge from the left onto the desired quest on the right. Challenges can be removed by clicking on the "X" in the top-right of the challenge's box, and re-ordered by placing elements above / below each other.
Clicking the up and down arrows to the left of a quest in the "Quest List" section will allow you to change the order in which quests appear on the main page.
Don't forget to save! To do so, press the "Save" button in the top- or bottom-right of the "Quests" page.
A section represents a collection of students who will be using the content in the same way: in essence, a course. The functionality in the section interface allows an instructor to set deadlines and record marks.
The reporting functions (accessed through the graph icon) allow an instructor to download a grade report for a section. Grade reports are generated as CSV files that can be imported into spreadsheet software. Each grade report contains data for a single quest. The instructor can choose which users (all or just those who are active) and which problems (all problems or just those that were marked as graded) to include.
The first three rows in the report files contain header information. The first row contains the name and URL of each of the problems included in the report. The second line includes the maximum score for each problem. Finally, the third line reports whether the problem was marked as being graded ("for credit") or not.
The edit functions of the section interface (accessed by clicking the pencil icon and then "manage content") allow the instructor to set when content becomes visible and when graded work becomes due. There are three options: visibility, an open date, and a due date. Quest visibility is normally "open". If a quest is closed, then it will never be visible, regardless of the open date. If an open date is set, then the quest will not be visible until that date. Finally, if a due date is set, then students will see the due date in their quest list and, once the due date passes, will be told that their submissions are past the deadline. Grade reports only include submissions that were made before the due date.